
Qualcomm hints 5G iPhones may be delayed; new rumor points to October launch
1 marzo, 2021
A14 RAM component reportedly leaks out in new photos shared on Twitter
1 marzo, 2021Fix Error 9 When Updating or Restoring Your iPhone
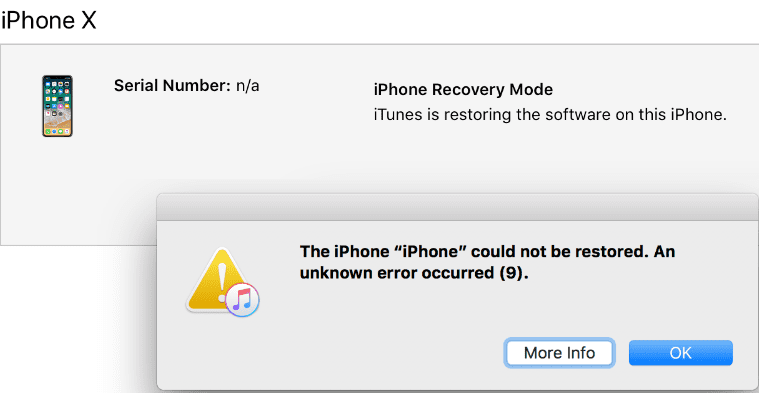
Error code 9 may sometimes rear its ugly head when you’re trying to update or restore your iPhone. It indicates that an unknown error has occurred and your device cannot install the latest updates or restore previous data. Let’s see how you can troubleshoot this error and complete the update or restore process on your iOS device.
How to Fix iPhone Error Code 9
Update macOS and iTunes
This error code (and many others) may occur when you’re running outdated macOS or iTunes versions. Click on the Apple menu, select System Preferences, go to Software Update, and check for updates.
Do the same for iTunes. Launch the App Store on your Mac, and click Updates to list all the available updates. Install the newest iTunes version available and check if you can update or restore your iPhone without getting error code 9.
By the way, make sure you’re logged in to an admin account. If you use a guest account, you won’t have the necessary access permissions to perform certain actions, including updating and restoring your phone.
Disable All Security and Privacy Software
Make sure there’s no security or privacy program running on your computer or iPhone. These programs may occasionally block the connection to Apple’s servers.
- On your Mac computer, launch the Activity Monitor to check what apps are running on your device.
- Then go to the Process Name list, and select the security and privacy apps you want to close. Needless to say, this includes your VPN and any apps that can hide your real IP.
- Click on the Stop icon to close the app. Or use the Force Quit option to force-close the apps on the spot.

Use a Different Cable and Computer
Additionally, try to restore your iPhone using a different USB cable if you’ve got one at hand. Maybe your current cable is damaged or faulty. Connect your phone to a different computer and check if you can bring the device to default settings.
Check Date and Time Settings
If you’re not using the correct date, time, and time zone settings for your current location, your devices may fail to connect to Apple’s servers. This might explain why you’re getting error code 9 on your iPhone.
- Click on the Apple menu and select System Preferences.
- Then select Date & Time and click the lock icon.
- Enter your password to unlock the settings.
- Go to the Date & Time section, and enable the option that says ”Set date and time automatically”. Select time.apple.com from the drop-down menu.

- Then click on the Time zone button and enable “Set time zone automatically using current location“.
- Additionally, go to System Preferences, and select Language & Region. Make sure your region setting is set correctly.


Enter Recovery Mode
As a last resort, try to update or restore your iPhone using Recovery Mode. Make sure to backup your data before you use this solution.
- Launch iTunes and connect your iPhone to your computer.
- Then press and release the Volume Up button. Do the same with the Volume Down button.
- Hold down the Side button and wait until the recovery mode window pops on the screen.
- When iTunes asks you if you want to update or restore your iPhone, select Update.
- Install the latest iOS version, and keep your data. Check the results. Hopefully, error 9 is history now.
- If iTunes fails to update your iPhone, repeat the steps above but this time, select the Restore option to restore your phone to factory settings.

Conclusion
There are many triggers that can potentially cause error code 9 on your iPhone. The most common ones include outdated macOS, iTunes, and iOS versions, incorrect date and time settings, or security software blocking the connection to Apple’s servers. Eliminate these potential triggers and check if the error is gone. Hit the comments below and let us know which solution worked for you.


